Cross stitch tutorial for beginners
In this blog you can find step by step instructions for how to cross stitch. We share our best tips for preparing your cross stitch project. And this cross stitch tutorial will explain how you can make a simple cross stitch, fractional stitches and double stitches. Each one of these stitches is easy to learn.

Cross stitch preparations
You may want to jump straight to cross stitching. But good preperations make a big difference for your cross stich project, so please keep reading.
1. Protect your fabric
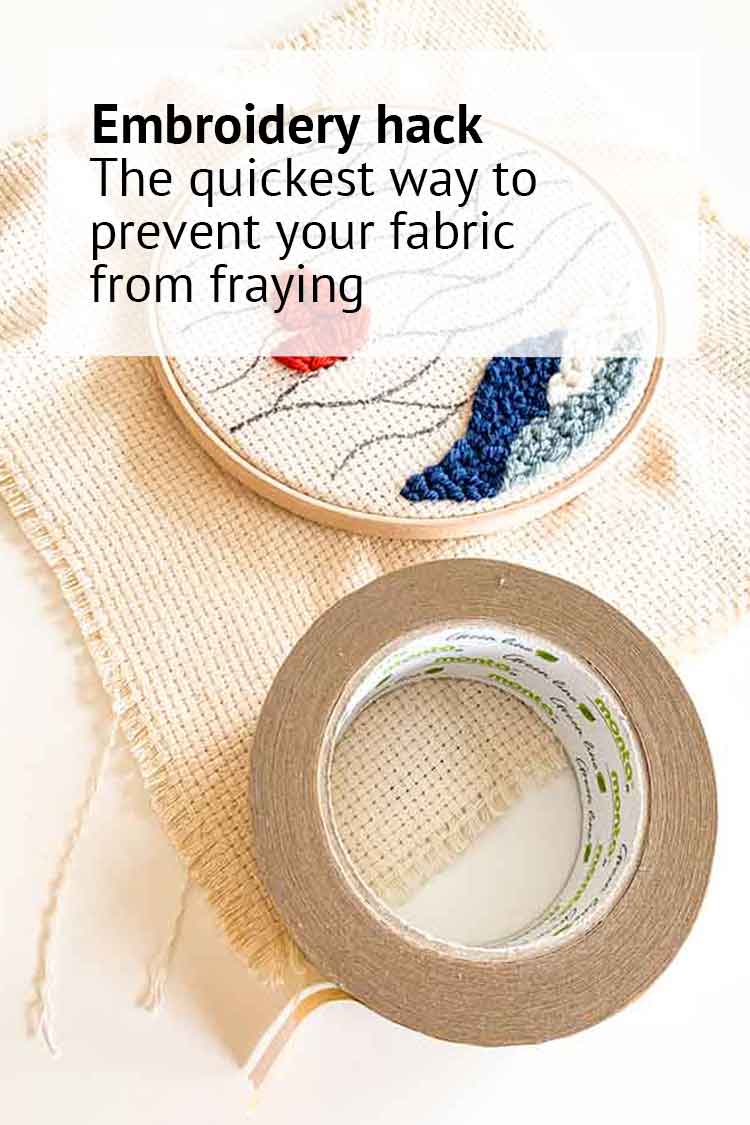
Some embroidery fabrics have edges that fray easily.
So your fabric gets smaller and smaller while you are stitching. Help!
Avoid this by sewing a zigzag stitch on all the edges of the fabric. You can do this by hand or with a sewing machine. And if you have a serger you can finish this task quicker.
Curious to see an even quicker way? Read this blog for the quickest way to stop embroidery fabric from fraying
2. Iron your fabric before you start
Really. Just do it.
3. Start in the middle of your fabric.
When you start cross stitching in the centre of your fabric you ensure you have plenty of room for your pattern.
You can quickly find the center of your fabric. Fold your double. Now double it again. Take a needle and insert it in the corner. Now open your fabric again. The needle will point you to the center.
On our patterns we include a triangle at the centre grid line and collumn. Follow both triangles and you will see where the centre of your pattern is.
4. Split your floss
Embroidery floss is usually sold in skeins with 6 strands that you can easily split. Depending on your fabric you will to use 1-6 strands.
If you stitch on Aida 14 count fabric, you will get the most beautiful result when using 2 strands of floss.
Take your embroidery floss skein. Cut a lenght of 1 meter. Take 1 strand (from the 6) and pull it. This will give 1 strand. take as many strands as you need for your project.
Read this blog to see how many strands of floss you need for your fabric.
5. Wash your hands
In Corona times we probably don’t need to say that. You wash your hands all the time. And your skin may have a desperate need for lotion.
Stop there. Don’t use those oily soaps or creams yet. They will stain your fabric.
Make sure you dry your hands well after washing them. It may sound a bit like your teacher talking, but it’s such a disappointment if you ruin your work.
6. Bonus tip for digital pattern buyers: Print your pattern.
We like to use a pen to mark all the completed stitches. But hey – your memory skills may be a lot better than ours.
How to make the different stitches of a cross stitch project
How to make a cross stitch instructions
Our golden tip for making perfect cross stitches is to start making all the first legs of your cross stitches as per your cross stitch pattern. After that you can easily stitch the second leg without having to look at your pattern. This method also make it easier to ensure the first legs of your cross stitches lean the same way.
Fully coloured boxes in the pattern are for regular cross stitches.

Each pixel of your cross stitch chart represents a quadrant of your fabric. Every quadrant has 4 corners with holes.

Bring the needle with floss from the backside of the fabric to the front. Then, go diagonally and bring your needle to the backside in the first hole. This makes the first leg of your cross stitch

Continue to make all the first legs of your cross stitches in this color

Once you have finished all the first legs, you will make the second leg of your cross stitch

Bring your needle to the frontside of your fabric in one of the empty corners.

Make the second leg of your cross stitch, pushing the needle diagonally in the opposite corner of your cross.

Continue to make all the second legs of your cross stitches until you are finished with this color embroidery floss.
How to make a half cross stitch

Half cross stitches are indicated with a diagonal line in the pattern, often accompanied with the floss symbol next to them. We hardly ever use half cross stitches in our patterns. We prefer to use 3/4 stitches as they give a filled look.
Bring the needle with floss from the backside of the fabric to the front. Then, go diagonally and bring your needle to the backside in the first hole.
You basically only make the first leg of your cross stitch.
A half cross stitch can be made in ‘///’ or ‘\\\’ direction.
How to make a back stitch line
We recommend that you first finish making all the cross stitches of your project before you start on your back stitch lines. Often, back stitch lines are used as borders of cross stitch patterns. Like when you stitch something with white embroidery floss on white fabric. Witouth a dark backstitch line surrounding your cross stitches you would not see the white stitches. Back stitch lines are also used to add details to a cross stitch project, like the smile on our Stitch a Job patterns.

Back stitch lines are indicated with colored lines in our cross stitch patterns. The color of the line indicates the color floss you need to use.

Bring your needle from the backside of your fabric to the frontside. Now go the next hole and bring the needle to the back.

Bring your needle to the front in the next hole

Repeat the previous steps as per your pattern.

You will start to see a dotted line on both the front and back of your fabric.

At the end of the row, return to stitch the missing spaces in your dotted line.

Keep working towards your starting point.

Bury the end of your thread on the backside of your stitches.
How to make a 3/4 cross stitch
With 3/4 cross stitches you have to punch through the middle of the crossing threads of your fabric. Stitching on Aida cross stitch fabric, this might be a bit trickier with a blunt needle. Especially on finer count Aida, you can consider using a sharp ending needle instead. When stitching on Linen over 2 threads, you can make the 3/4 cross stitch with a blunt needle.

Half colored boxes in our cross stitch patterns are for 3/4 cross stitches.

Bring the thread from the backside of the fabric to the front in one of the corners of your long leg. Then, cross the diagonally and make your long leg.

For your second leg (the half leg), bring your needle to the frontside of your fabric in the corner. Then bring it to the back where you cross the first leg. So this is in the middle of your cross stitch.
Look at the pattern to see in which direction the long leg, and the half leg should be made.
How to make two 3/4 cross stitches in one cross stitch

A pixel can also be made with two half pixels. You then make two 3/4 cross stitches in one quartile of your fabric.
Make a 3/4 cross stitch with the first color.

Similarly, add the second 3/4 cross stitch next to your first 3/4 cross stitch.
Ensure that your ‘long legs’ are nicely placed next to each other. Avoid overlapping threads as they look messy. It might help to stitch with half the strands that you normally would use to make a double 3/4 cross stitch.
How to make a French Knot
A few tips to keep in mind while making French knots:
- Keep the tension on the strand at all times – the knot should be starting to form before the needle is even through. If you’ve done it right, the double wrap will form a tight little “bobble” at the point of insertion – the french knot.
- Pull through slowly so your stands don’t get into the wrong kind of tangled and knotted.
- As you’re pulling through, continue to hold the thread taut with your left hand with a slight loop held by your thumb so it doesn’t tangle. The threads will then knot themselves into the right shape.

French knots are indicated with a dot in our patterns. They are at intermediate-expert level.

Bring the thread to the front side of your fabric at the place where you want to make your French knot

Point the needle downward and wrap the thread around the needle three times.

Put the point of the needle back into the fabric just a thread or two away from the place it came up from on the back side. Then, pull the string tight around the base of the needle, forming the beginning of the knot.
Pull the strand through the doubled wrap and down through the fabric.

Now secure your thread on the backside of your fabric under another existing stitch, to Ensure your French knots don’t unravel. If you want to make multiple French knots, you can either tie them off or anchor them in existing stitches.
How to bury the ends of your thread when cross stitching
Once you finish cross stitching with a color, you need to secure the floss so it will not unravel. To avoid ending up with tens or hundreds of knots at the backside we recommend you to bury your thread under some stitches.

1. Bring your needle to the backside of your cross stitch project

2. Run the threaded needle beneath the horizontal threads and continue for at least 4 threads. To make it extra secure, run it under 6 or more if you want to launder your work.

3. Use embroider scissors to cut of the end of your floss as close as possible to the fabric
How to introduce new colors to your cross stitich project
Once you already stitched a few cross stitches of your project you can easily start with a new floss with a burried stitch. With this method you will not get hundreds of knots in your project, and your backside will look neather.
Step 1

Start on the backside of your embroidery. Thread your needle without a knot. Pull your needle under a few loops of already stitched cross stitches.
Step 2

Run it under at least 4-6 loops to ensure it stays in place.
Step 3

Bring your needle to the frontside of your work. Don’t pull to hard when making the first cross stitch with your new color. Cut off any excess threads at the backside of your fabric.
How to finish your cross stitch project?
- When you are finished embroidering, iron the back of your work with steam.
- Cut off any excess fabric.
- You can frame it, fix it in an embroidery ring or use as application.
- In this blog you can learn how to frame your work in an embroidery hoop.
We would love to see a picture of your finished piece!! Really we do! Great if you can share yours at our Instagram account or use #studiokoekoek
Tips that will make you cross stitch like a pro
- Aim for an even tension on your stitches. Don’t pull too hard as they will warp the fabric, and don’t leave them to loose so they will look sloppy. The stitches should lie flat against the fabric without pulling against it.
- Embroidery floss tends to get twisted as you stitch. Every once in a while, let your needle hang freely to let the thread unwind.
- On the backside of your project, avoid making long jumps because they might show through the openings on the front. When you have to skip more then 4 blank pixels, we recommend that you secure your floss and start with a new thread.
- A simple advice to ensure you get the most beautiful result: be consistent in your stitching. So the first line of your cross always leaning in the same way. It doesn’t matter if you start your cross stitch going ‘////’ or ‘\\\\’ as long as you are consistent with this pattern over the entirety of your project.
- Don’t forget to take it relax: sip your favorite drink while you go. For us a Cappucino please!