How to use the Clover Punch Needle Instructions
You may have read our punch needle tutorial for beginners and learned a lot about how to punch needle and how you can avoid the most common issues. In this blog we will share a few more tips specifically focussing on the Clover punch needle we sell in our shop. The coolest of this punch needle is that you can get 4 different refill needles so you can combine different thickness of thread in your work. From 1 strand of Embroidery Floss up to Fine Wool.
On this page, you will learn how to thread this needle. You can read our tips for foundation fabric that is a perfect match with this needle. And we also show you how you can add depth to your work.
How to thread a punch needle?
To get your wool or floss into your punch needle you will need a threading tool. For the clover punch needles you will need a thin metallic wire threader . Without the threader you will strugle to get your thread through the needle.
Step 1

Put your needle threader in the long end of your needle. Enter your needle from the sharp end of your needle, the side that you will poke into your punch fabric.
Step 2

Pull your thread through the metalic threader that comes out at the backside of your punch needle
Step 3

Pull your needle threader from the front side of the punch needle all the way through your needle. Your yarn is no threaded through the large end of your needle as shown on the picture.
Step 4

You will now need to thread your yarn through the opening in the needle (the needle hole). First bring your needle threader through the needle hole and put your yarn in between the metalic threads of your threader.
Step 5

Pull the needle threader. This will make your thread come through the opening. Be carefull, the threader can easily break if your yarn is too thick for your needle.
Step 6

Voila! This is how your threaded needle looks like.
You are now ready to start punching. Learn in our earlier blog how to punch step by step
Which yarn or floss can I use with the clover punch needle?
For the clover punch needle there are 4 different refill needle sizes available. Each refill needle can be used with a different thickness of yarn or floss.
Buy the Full clover punch needle set and you’ll get a discount!
The Starter Set with 3 ply refill needle
You will need the Clover Embroidery Stitching Tool Start Set to get the base where you can insert the different punch needles. The starter set includes the 3ply needle. This means that you can use this refill needle with 3 strands of DMC embroidery floss, or similar.
We find it a bit impractical to work with 3 strands. With punch needle embroidery you like to work with a long continues thread. To work with 3 strands of floss you need to seperate the 6 strands of your floss, and then combine 3 strands again to have the right thickness of thread. That is why in our punch needle kits, we combine the clover starter set with a different refill needle.

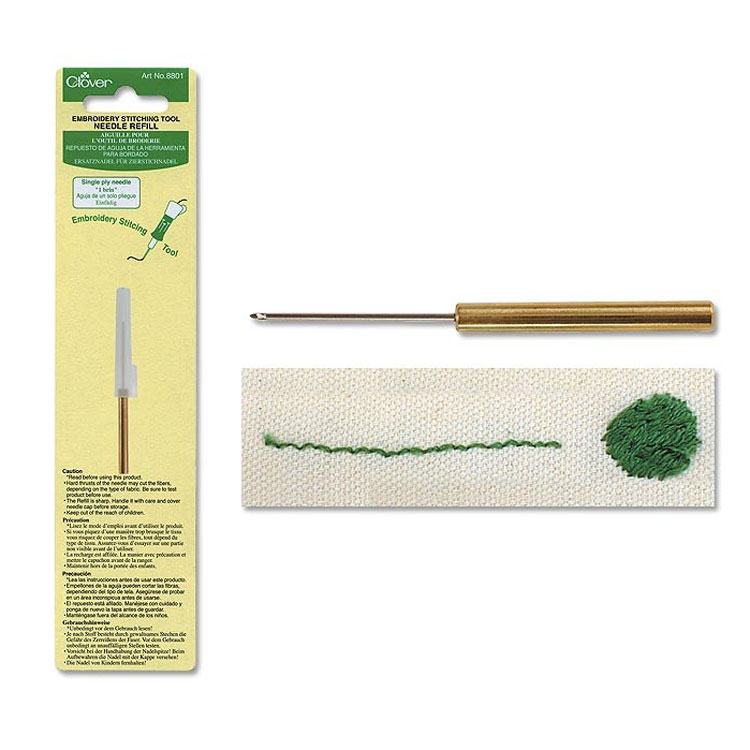
The 1 ply Refill Needle
This is the thinnest refill needle for the clover punch needle. With this needle you can work with 1 strand of DMC embroidery floss. So you can make stunning details in your work.
When working with this needle, seperate the 6 strands from your floss and pull out a single strand. As this is a very fine punch needle, you can also use it to decorate denim fabrics.
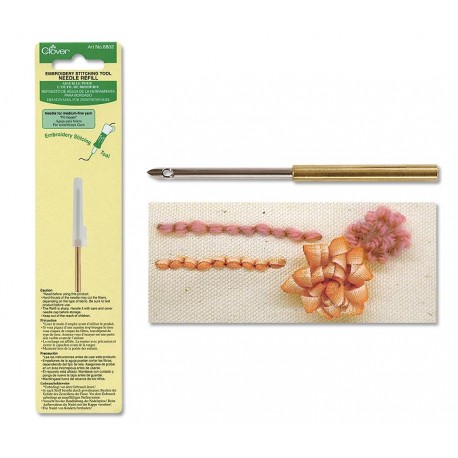
The 6 ply Refill Needle
We love working with this refill needle for the clover punch needle. With this needle you can work with 6 strands of DMC embroidery floss. So you can just take a full embroidery floss skein and start punching directly.

The Medium Refill Needle
This is the thickest refill needle for the clover punch needle. With this needle you can work with medium fine yarn, like our Lanita Ecological Wool, and other yarn or ribbon up to 3 cm thick.
You can use the clover medium refill needle.
Which foundation fabrics are suitable for the clover punch needles?
Each punch needle has a different thickness. To ensure that your loops stay nicely in your fabric, it is important to use the correct fabric for your project. If a fabric is too open woven it might be nice for the thickest refill needle of clover, but when you work with a finer needle your loops will pull out easily. And if your fabric is too dense it will be harder to punch with the thickest refill needle.
We tested the clover punch needle with a large number of fabrics to provide you the best fabric that works with all 4 different refill needle sizes of the clover punch needle.
Our prefered fabric for the clover punch needle is our GOTS certified punch canvas. This is a beautiful canvas that you can use with all different refill needles from Clover. It is available in multiple treding colors, making it possible to leave part of your work uncovered with stitches. It is also a great fabric to turn your punch needle project into a cushion cover.
- All production steps of this fabric are GOTS certified, the world’s leading standard for good practices in the textile supply chain. There is stringend control on both environmental and social criteria.
- Colors are produced free of harmful substances like toxic heavy metals.
- This cotton is biodegradable.


Fabrics that did not pass the test for the clover punch needle
We also tested the clover punch needles with different evenweave linen fabrics, but found that the tested qualities where not suitable for this punch needle. With linen fabrics the thread breaks more easily making it more difficult to redo a section when you make a mistake. You also have to poke harder making it more difficult for your hand.
We will continue testing fabrics and will share updates on our blog on test results. If you have questions about fabrics, please feel free to contact us!
How to create depth in your work
Other than the wooden adjustable punch needle, with the clover punch needle you cannot adjust the height of your loops. But you can still create depth in your work!
Punch parts of your project from the backside of your fabric, and parts from the frontside of your work!
Flat stitches will appear on the side that you are punching, and loops will pop out on the other side of your fabric. So when you punch from both sides of your fabric you can make part of your project pop. See another example in our earlier blog with a free punch needle pattern

Shop Matching Supplies for this Punch Needle